nuffnang code

Saturday, March 31, 2012

Of Marriage and Make up

As a 22 year old single girl, marriage may very well be the farthest thing from my mind. But not for some of my friends, as there are already quite a few who got hitched or are getting engaged! Sometimes I go into panic mode and start thinking that I should find myself a boyfriend fast, if I don't want to end up sad and alone forever haha.

But since that's not bound to happen anytime soon, I'll stick to attending my friends' weddings which is just the perfect excuse to getting all dressed and made up.

My good friend from college, Q got married a couple of weeks ago in Bacolod City. I took the first trip out to Bacolod on the day of the wedding, and because I woke up late I wasn't able to do my make up before leaving the house and I had to do it in the ferry during the hour-long trip (good thing I didn't have seatmates, haha). I also did my friend J's make up.

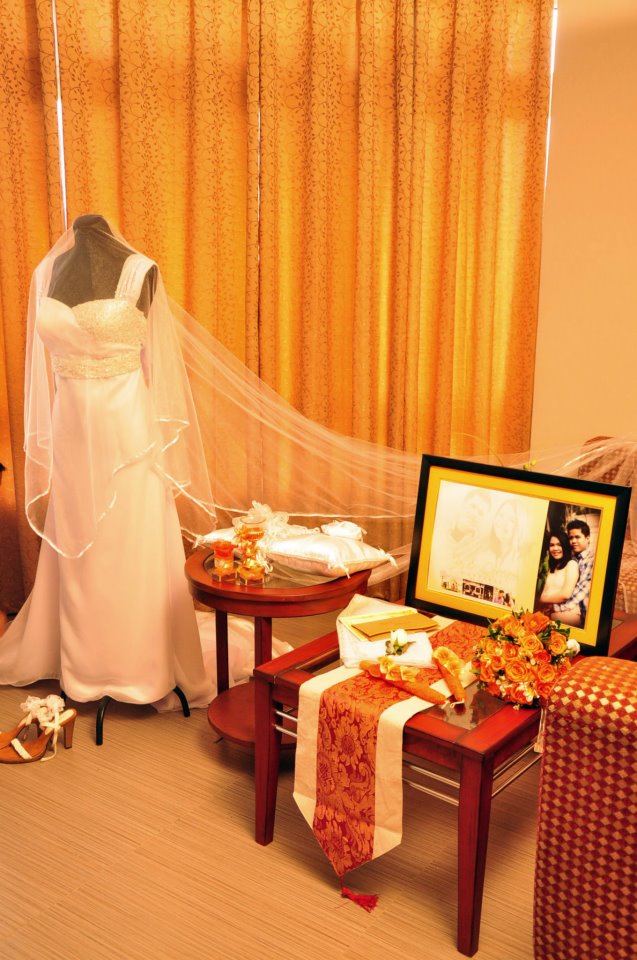
The wedding was very nice and intimate, held in a small chapel away from the city. It was just the bride and groom's family members and a few close friends. It was followed by a garden reception held at their residence. If I were to get married someday, peg ko talaga ang wedding ni Q! Hehe.

The wedding dress, designed by Q herself...


Pictures from the reception...


The lovely bride, Q

And the very happy couple... Mr and Mrs. G!

 So now on to the kikay part of this post... If you want to see how J and I look like sans make up, check out this photo:

@ Cafe Bob's


For myself, I chose to do a neutral eye and a bold lip:


Face:
First, I primed my face using Loreal's Base Magique primer to make sure my make up stays put until nighttime. Concealed under eye circles using Coastal Scents Camouflage Palette. I then applied Maybelline Aqua Gel Foundation in Natural Beige all over the face with a foundation brush.

Eyes:
I applied a pale gold shade from lids to browbone, then used a soft matte brown eyeshadow to countour along the crease. After doing the eyeshadows, I put Elf Eyeliner in Brown, following a thin to thick pattern as I went along from the inner part to the outer part of the eye. Curled my lashes then added 2 coats of Estee Lauder More Than Mascara. To define my brows, I just used a dark brown eyeshadow and a slanted brow brush to fill in and shape.

Cheeks:
With a slanted blush brush, I used the Soft Pressed Powder Pink Blush from Clinique's Color Surge Eyeshadow duo on the apples of my cheek. Didn't do any contouring at all; I just wanted a nice, soft glowing look.

Lips:
I exfoliated my dry, flaky lips with a toothbrush, then filled in the entire lip area with Stila Lip Liner in Contour no. 2, which is a deep red shade with brown undertones. I layered Wet n Wild Lipstick in 522 A (Dark Wine), which has a silk finish, on top to offset the super matte look of the lipliner. 


J, who is averse to all things girly and is practically allergic to make up (and i mean that figuratively), just wanted to enhance her over-all look. She didn't want strong colors, just something that didn't require so much products.


Face:
I used Celeteque moisturizer for J's dry spots (the areas around her nose) then applied Maybelline Aquagel Foundation in Natural all over her face using a wedge sponge just to give her sheer coverage, while covering problem spots.

Eyes:
I used a fleshy matte shadow from lids to browbone, then a shimmery brown gray shadow to contour. I lined her eyes with Elf Liquid Eyeliner in Black. I curled her lashes and used 2 coats of Maybelline Great Lash Mascara for enhanced but natural-looking lashes. For her brows, I just filled in the sparse spaces using Etude House's Drawing Eyebrow.

Cheeks:
For a subtle, flushed look, I just dabbed Allue (from HBC) cheek tint on her cheeks.

Lips:
She didn't want any pinks/reds so we settled for a nude lip using Ever Bilena Matte lipstick in Mauvey.

Photo credits to: J.K.V.G


Sunday, March 25, 2012

4 Color Concealer Wheel review

Dark undereye circles has always been my problem, and I'm always on the look out for the perfect concealing product. My current favorite is from the Coastal Scents Camouflage palette, but it's big with 10 pans and so not convenient for travelling or for everyday life (I like smaller, "handier" stuff for everyday use).


The Coastal Scents website actually has a 4 color concealer wheel, but unfortunately is not available locally. I don't know if it's as good as the full size camo palette though. So I was pretty excited when I saw what I thought was a dupe for the 4 color concealer wheel on a local Multiply Site. They have it in light, medium and dark. I got the light concealer wheel.


Sadly, it's nothing like the CS concealer. It's not as creamy, and it blotches when I tried to apply it on the eye area. I tried it again with primer underneath, but it was still blotchy. You have to be really, really careful when you apply it, so this is not good if you're always in a hurry or don't like taking so much time to do your face. Also gets cakey when used with foundation. 


I don't like wasting make up so I found other uses for it- I use it as a highlighter or eyeshadow base. It also does a decent job as a spot concealer.


Would I repurchase?
No, I was actually quite disappointed with this product.

Saturday, March 24, 2012

Movie Make up Peg: No Other Woman (Part 2: Kara Zalderiaga )

I've always had a girlcrush on Anne. Who wouldn't? She's gorgeous, sexy, talented and funny! It's pretty much difficult to hate her, but she was so believable in her husband-thieving role as Kara Zalderiaga (which just proves that she can definitely can act) that you just wanted to get mad at her for allowing herself, a beautiful woman, to pursue a married man.

Now for Part 2, Anne Curtis'  "mistress" look:

Notes on her Look:
  • Dark brows
  • Contoured cheekbones
  • Lightly smoked eyes
  • Nude lips
  • Voluminous, wavy hair


I did this look right after I did the Christine Reyes one, with just some slight modifications:

Eyes:
1. Since Anne's brows are darker than Christine's, I removed the light brown brow tint using a spoolie brush. I didn't have to reshape/reshade.
2. Apply shimmery pale eyeshadow onto browbone to highlight
3. I used a dark gray E/S for the outer part of the eyes. Apply onto outer V and blend into crease.
4. Using a slightly lighter gray E/S, apply onto inner portion of eye and blend with the dark gray shadow.
5. Blend everything really well

6. Use dark kohl pencil/pencil eyeliner to line lower rims of the eye. 
7. Layer pencil liner over the liquid eyeliner on upper eyelids. Blend it out with a brush/ cotton bud to get a smokier look

Cheeks:
Anne has really high cheekbones, and to those of us not blessed with this asset, fake it with some brown contouring powder. Smile, put the shadow onto the cheekbones and slightly a bit into the apples of the cheeks.Top with a bit of peachy blush. Be really careful about how much you apply or where you apply the blush, as too much can make you look like you have a dirty, NOT a contoured face.

Lips:
My nude of choice is Ever Bilena Matte lipstick in Skin.

Hair:
I used wavy 22 inch hair extensions here. Another option for long-haired ladies is to set your hair with extra hold hairspray, blowdry it upside down for extra volume, and create big curls with a curling iron or rollers.


Achieve na ba? What other celebrity make up looks would you like to see? :)


Movie Make up Peg: No Other Woman (Part 1: Charmaine Escaler)

Although I do not aspire to be an "other woman" nor do I want to be a victim of one, I have to say I really like this movie- the plot (but weirdly enough, hated the ending), the gorgeous main cast members, and of course, the clothes and the make up!


Today's post is inspired by Christine and Anne's looks in the movie. I know that I look nothing like these gorgeous women, and I sure as hell still won't after my make up session haha. But still, their make up looks are inspirational and something that we can totally wear for everyday life.


So here are the looks... First up is Christine Reyes' aka The Good Housewife:


P.S. This is her post-make over look, but her make up is still sweet, natural and toned down. Great for day.


Products Used:

Face
Celeteque moisturizer
Maxfactor Panstik in Medium
Coastal Scents 6 Contour Blush

Eyes
Coastal Scents 88 Warm Palette
ELF eyelash curler
Maybelline Volum Express the Falsies
ELF liquid eyeliner in Brown
Nichido Spot Concealer in Beige
Etude House Color my Brows in Light Brown

Lips
Coastal Scents 32 Lip Color Palette


How To:
1. I applied Maxfactor Panstik all over the face using a foundation brush
2 I did my brows first- I filled in sparse areas, and applied light brown brow tint from Etude House to match the light shade of Christine's brows. Lightening my brows also made the over all look softer
3. Pat on flesh colored E/S all over eyes.
4. Take a light brown shade, wash color onto crease of eye to create a soft contour. Don't overdo :)
5. Take a darker brown E/S, apply onto outer V of eyes. Wing it out a bit, but make it very subtle and not too harsh. Blend into crease of eye.
6. Take a white E/S and appy to browbone to highlight.


7. Use Nichido Spot Concealer in beige and line lower rims of the eyes to make eyes look fresh and awake.
8. Curl lashes, and apply mascara only to outer edges only.
9. Line upper lids with liquid eyeliner, but don't go all the way up to the outer corner of eye. Stop just before the outer part of lash line. Wing it out a bit at the end.


To Contour Face:
1. Use a matte brown contour powder under the cheekbones
2. Apply light, peachy pink blush onto apples of cheeks.
3. Set with transluscent loose powder


Lips:
1. I used a carnation pink on the lips, applied with a lip brush

That's it For Part 1, Part 2 coming up in a bit :)

Wednesday, March 21, 2012

Mascara Soulmate: Maybelline Volum Express The Falsies

I've tried on a lot of mascara brands before and I've had my favorites, but I've never been loyal to one. I don't think I have ever repurchased the same tube of mascara! But I'm pretty sure Maybelline's The Falsies will break my mascara-hopping habit. I was actually selling these and several other Volum Express mascaras(The Colossal, The One by One, etc) on my online store a couple of months ago, and I'm glad I was able to save one for myself. Personally, this is the best mascara I've tried (also better than the overhyped Maybelline Great Lash, which I found quite disappointing).


It has a curved spoon brush instead of the usual straight brush
Left: Curled only, no mascara. Right: Curled with mascara

Finished look for work

What I Like:

  • Lengthens and volumizes
  • So easy to apply, doesn't clump
  • I don't need to comb my lashes after application (which I used to do when I used Estee Lauder because it made my lashes clump)
  • No spidery lash effect
  • You're good to go with 2 coats
  • Definitely gives you dramatic lashes
  • Cute packaging, I love the purple tube and metallic blue lettering

What I don't Like:
None! Or maybe just the fact that it's so overpriced at the mall (Php 449 or Php 449 I'm not sure), I used to sell it for only Php 375. I'm currently all sold out already :(


Would I repurchase?
Yes yes yes! Really lives up to its name "The Falsies". I guess I can say I've finally found my mascara soulmate after years of searching :)


Sunday, March 18, 2012

Navy and Pink

I am currently in love with navy liquid liner. I am loving it more than the usual black and brown! I was able to get the ELF eyeliner collection (black, brown and navy) all three for Php 249, plus 10% discount, awesome right?

So today I decided to make the eyeliner the focal point of my look. My inspiration was taken from one of the looks Selena Gomez sported in her "Like A Love Song" music video.


What I Used:

Eyes: ELF liquid eyeliner in Navy Blue 
Lips: I mixed Face Shop PK102 with Ever Bilena Matte Pink Flame

The look is super wearable even for day, aylavet :)


Saturday, March 17, 2012

Bella Swan Make up Look: modelled by Aoife Fahy for The Brown Paper Bag

Have you always dreamed of having Edward Cullen watching over you as you sleep at night, or having a hot guy with a 6 pack keep you warm while you're shivering in the cold? While those are obviously beyond our wildest dreams, it's not a crime to want to look like the girl being fought over by a vampire and a werewolf.

On screen, Kristen Stewart's Bella Swan character is naturally gorgeous, wearing only light and minimal make up. Lots of neutrals and light contouring, and the main focus is kept on the skin- she always looks flawless.


So here are some general notes on Bella's look:

  • Pale, flawless skin
  • Filled in (but not overdone), naturally shaped brows
  • Eye and cheek contouring has to be light and very subtle
  • Use a light hand when applying make up, blend out every now and then
  • Apply a lip color that's almost the same shade as the lips (neutral colors/fleshy pinks or browns)

What I used:

  • Maybelline Aqua Gel foundation in Natural
  • Coastal Scents 88 Warm Palette
  • Coastal Scents 6 Shades Contouring Palette
  • Coastal Scents 66 Lip Color Palette

How to:
1. Apply foundation with a wedge sponge. This provides sheer, medium coverage. Concentrate on areas with uneven skin tone/discoloration
2. I used a fleshy beige color all over the eyes, up to the browbone
3. Apply a soft brown shade all over lids
4. To contour the eyes, I used a reddish brown shade along the sockets of the eyes
5. To contour the cheeks, I used the brown contouring powder of the 6 Color Palette and applied on the temples, below the cheekbones, and jawline
6. Very light dusting of pale pink contour powder on the cheekbones
7. I used a fleshy pink color for the lips, then
8. Black mascara on the lashes


 Photos by: Mien Tagua

Ever Bilena Matte Lipsticks

Recently, I've been wearing lipstick almost everyday (I just used lipstain before for daily use) and I don't find it practical to go through a Php 600 tube of lipstick in 3 months! So I looked around for more affordable alternatives and rediscovered Ever Bilena Matte lipsticks.

My first tube of EB matte lipstick was given by my gay bff, and it was in the shade "Skin". I immediately fell in love with it. I loved its nude color, a perfect match for black smoky eyes. And unlike other matte lipsticks I've tried before, it didn't make my lips dry.

I currently have it in 4 colors. I actually have a fifth one, Off Beat Pink, but I accidentally left it in the trunk of my car for a week so it melted and broke off :(
L-R: Skin, Mauvey, Pink Flame, Scarlet


The Shades:
L-R: Skin, Off Beat Pink, Mauvey, Pink Flame, Scarlet
On my lips:

  • Skin- a nude color, great with smoky eye looks. I don't like it for everyday use, unless I do intend to look sick for that day. haha
  • Off Beat Pink- a pale pink shade, top with gloss and it looks like something Nicki Minaj would wear (not included in lip swatch)
  • Mauvey- a muted mauve shade, kind of looks like Skin, only with slight purple undertones
  • Pink Flame- this has officially replaced my Face Shop PK102 as my everyday lipstick. A very pretty pink, perfect for when you want to feel girly
  • Scarlet- on the tube, I expected it to be a true red with blue undertones, but on the lips it was actually more of a coral shade. Not what I expected, but still nice

General Notes....

What I like:

  • The color selection- they have a nice selection of the basics: nudes, pinks, and reds. They carry more than 10 shades
  • The consistency- doesn't dry out lips, doesn't flake even after long periods of time
  • Color pay-off- they're nicely pigmented, but if you really want the colors to show up apply 2 or more coats
  • The price- only Php 145 each
  • It's Philippine-made :)
  • You can find these practically anywhere- department stores of malls (not just SM), Watson's, Rose Pharmacy. If you need an emergency purchase or a quick beauty fix, they're so easy to find

What I don't like:

  • The packaging- it looks nice, but the colored cap comes off so easily! You can either glue it on to secure it, or just remove it altogether to avoid messy mishaps in case it comes off inside your bag. 
  • Minor quality issues- before you pay for your purchase, be sure to let the saleslady check if the item has no damages. Some of the lipsticks look like they could break off easily from the holder. They also easily melt in the sun, so don't leave them out too long in hot places.

Sunday, March 11, 2012

Etude House Proof 10 Eye Primer

This primer has been getting a lot of good reviews (it has a 4.8/5 rating on makeupalley.com) and a lot of  make up artists/ beauty bloggers claim it's as good as Urban Decay's Primer Potion and Too Faced Shadow Insurance (both of which are way beyond my budget). So when I was able to get one for myself, I'm glad to say it did live up to all the hype. If you are looking for a good but affordably priced eyeshadow primer, this one definitely fits the bill.


It looks beige in the bottle, but when spread out it's translucent. 


What I like:

  • Makes eyeshadow last all day long (more than 12 hours), prevents creasing/smudging
  • Makes colors more vibrant and pigmented
  • Easy to spread
  • Consistency is perfect- upon application, doesn't dry too fast or too long. Just wait for about 5 seconds and you can start applying eyeshadow
  • The price- only Php 298
  • Easy to find- available at all Etude House branches

What I didn't like:


The packaging- don't get me wrong, it looks nice, but it has a doe foot applicator which can be a bit unhygienic; plus when you've almost consumed the contents, it will be a bit hard to scrape up all the remaining product. It would've been nicer if it came in a squeeze tube.


How to Apply:

  1. Take a small amount, swipe it onto an empty make up palette or the back of your hand (compared with swiping it directly onto lids, I find it more hygienic this way haha)
  2. Spread all over lids and up to the browbones. I also sometimes put a bit of primer onto the lower lashline.
  3. Apply eyeshadow

Would I repurchase?


Yes!

Wednesday, March 7, 2012

Quick and Easy At Home Facial with Garnier

Need to do a quick at-home facial that doesn't require so much time, products, money and effort? I just discovered my new 5 step routine to cleaner and brighter looking skin with the use of Garnier's Skin Naturals facial masks. They come in two variants, the Pure Self Heating Sauna Mask and the Lightening Peel Off Mask. I use the two masks in one "session", and use a facial scrub in between.


Garnier Pure Self Heating Sauna Mask Product Description:

  • Specially developed with clay and zinc
  • Unclogs pores
  • Removes sebum
  • Self-heating
  • 2 x 6ml (each package contains 2 masks)
The formula generates a self-heating action on contact with the skin. Specially developed with clay and zinc, it works to remove impurities and excess sebum to unclog pores and refine skin texture. Your skin feels deeply cleansed and looks shine free. It feels purified for up to 7 days.

What I Like:
  • The warm sensation upon application
  • No stinging and irritation; no breakouts afterwards
  • My nose and chin felt clean (especially after exfoliating), most of my blackheads disappeared
  • Super cheap at only Php 50 for two 6 ml sachets (I get about 4 uses)
  • Easy to find; look for it in drugstores and Watsons outlets
What I didn't Like:
  • The packaging- since they come in sachets it's kind of messy to get the product out. I wish they came in full size tubes or tubs.
Lightening Peel Off Mask Product Description:

Garnier Light Lightening Peel-off Mask is a peel off mask is real “anti dull skin” solution to gently remove impurities and dead skin cells that darken complexion. It instantly reveals a brighter complexion. You recover a naturally healthy-looking glow and skin texture is refined. 

What I liked:
  • The light, citrusy smell
  • It really did brighten my skin! The glow lasted for about 3 days.
  • Super cheap at only Php 50 for two 6 ml sachets (I get about 4 uses)
  • Easy to find; look for it in drugstores and Watsons outlets
What I didn't like:
  • Still the same as the first- the inconvenient and messy packaging.
How to:
1. Cleanse face with your usual facial wash. Pat dry.
2. Apply the Self Heating Sauna Mask on your T-zone- forehead, nose, and chin. Leave on for 3-5 minutes, then rinse.
3. Exfoliate with a gentle facial scrub of your choice (I use the one from Human Nature). Rinse and pat skin dry.
4. Apply the Lightening Peel Off Mask, leave on for at least 15 minutes. You can also leave it on a little longer  while doing your paperwork, watching TV, etc.
5. Peel off, apply moisturizer.
Note: For best results, try it every other week :)


Overall Review:


Will continue buying (this is my 2nd repurchase) because I really like the product, I believe I'm getting great value for my money (I did the math and if break down the costs I only spend around Php40 every time I do my facial haha) and I guess I'll just have to live with the packaging.