nuffnang code

Friday, April 27, 2012

Make Up 101: Anatomy of the Eye


Today, I was talking to a friend about make up. She's really attractive with gorgeous facial features, but doesn't wear any make up at all. She gets kind of overwhelmed with all the products and tools and colors but she's interested to learn just the basics. She already has the stuff she needs (for eye make up) but she doesn't know where to start. Our conversation inspired me do a post about "eye anatomy" for make up application, since this is not the first time I hear other people complain that they could never do even the simplest of eye looks.

I've done eye make up tutorials here and I use some "technical" terms like crease, outer V, etc but I never bothered to explain what exactly they mean. So to get you started, here are the basic parts of the eye for make up application:


1. Browbone- the area just below the brows. This is where you highlight with pale/light colored shadows.
2. Lid- the entire fleshy area in between the crease and the upper lashline; usually where you apply your base color
3. Crease- found in between the browbone and the lid, the part of the eye where it "creases". This is where you apply darker shadows to create depth in the eyes
4. Outer V- the outer corner of the eye. Color is applied in a sideways V shape to create an even more dramatic look. Black and other dark colors are best for this part to give the illusion of larger eyes.
5. Inner corner- or tear ducts; white/shimmery colors are best for this area to brighten up the eyes


6. Upper lashline- on the eyelid, where your lashes are. This is the part where you apply liner (all forms) and false eyelashes
7. Lower lashline- on the lower part of the eye, holds your lower lashes. 
8. Waterline- this is actually inside the lower lashline. It's that fleshy, moist inner line leading towards the inner corner. To make eyes look wide awake, try lining this part with a white or flesh-colored pencil. To make eyes look more defined and dramatic, use a black kohl or pencil liner.

Hope this was helpful to all make up newbies out there! :)


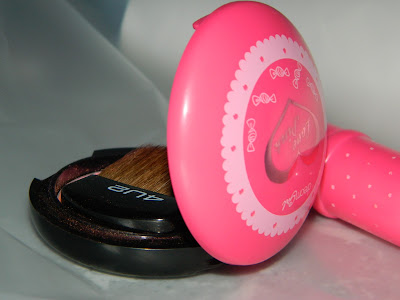
4U2 Dream Girl Duo Blush Review

I was feeling a bit sad yesterday, and I decided to combat a bad case of the blues with some pinks! There is nothing quite like make up to cheer me up on a gloomy day (food comes in at a close second).

For some reason, I've been gravitating towards pinks and stuff with pretty packaging lately. Those are practically the reasons why I got these in the first place. Oh and the prices, of course! :)


I went to my favorite place to get make up- the department store. I got a matte pink lipstick from Nichido and a duo blusher from 4U2. I'll do separate reviews for each to avoid feekchoor overload :)

This is my second purchase from 4U2, the first one was lipstick. I was satisfied with the quality so I wanted to try something else from them. 


I was actually supposed to get Elf's Duo blusher/bronzer but then after browsing some more, I saw this and got this one instead. Did a road test today and I must say I did not regret switching Elf for this!


Swatches (Middle: pink shade, Bottom: bronze shade)

What I Like:
  • Like I said, pretty packaging! I also love that it's small and compact and already has a mirror and a brush included inside. This baby could easily fit into your make up kit or small purse for night time events.
  • The brush included is pretty decent, no shedding (yet) but this type of brush is easy to replace and cheap
  • It's a duo blusher, so you can contour with the darker shade and color with the pink shade. There are also other shades available, so you can choose one that matches your skin tone best
  • It has a pearlescent finish- no messy glitters or shimmers. I hate products that contain a lot of shimmer because sometimes it just ends up everywhere- my clothes, hands, stuff, etc. Good thing this one isn't like that
  • Very pigmented. A few strokes will go a long way. 
  • Staying power- it lasted a good 10 hours on me without any retouching in hot and humid weather. In fact, the longer I wore it the more natural it looked

What I don't like:
None!

Would I repurchase?
Definitely :)

Where to get?
4U2 counters at department stores and Watsons, for Php 194

Tips on How to Use:
  • When using pigmented products, just remember to apply make up in a place with adequate lighting (you don't want to look like you literally did your face in the dark) and to build up the color gradually. Tap out excess product from the brush too before applying it on the face.
  • Use the pink if you want a nice rosy blush, the bronze for a contoured look, or combine both for a sun-kissed effect.
How about you? What's your favorite blush/bronzer? 


Wednesday, April 25, 2012

The Brown Paper Bag's "Style over Trends" shoot

This post is waaay overdue, but I'll post it anyway because we really had a lot of fun here. Last month, Iloilo-based clothing store The Brown Paper Bag shot their brand ambassadors campaign and I was glad to be chosen as one of the ambassadors- one, because I really love their clothes; two, I love working with TBPB's stylish, creative, and risk-taking owner, Mien; and three, shooting with the other girls is super fun because it's like a big kikay-fest with all the clothes, shoes, accessories, make-up, and of course, the girl talk!

What's even better about this shoot was that we got to style ourselves. Mien brought with her racks of clothes and accessories and we got to put them together which ever way we liked. Each of us also had distinct styles, and I was Miss classic/minimalist. Other styles featured were fashion-forward, biker chic, boho and preppy.

I wasn't supposed to do the other girls' make up that day (but I really would've loved to) so I didn't have all my stuff with me; luckily I had the basics so I could at least come up with some decent looks.

Here are some behind the scenes photos:

Engaging in some pretty intense cam-whoring... There are actually more where these came from, lol


Still being my usual nerdy self in between shots


Shoooooeeesss!!


My work station


Doing I's make up


Group shot! :)


And after 5 hours, a giant box of pizza, hundreds of camera clicks and countless outfit changes... Here are some of the photos for the campaign:

(I did the make up for these; click on photos to enlarge)


If you like the clothes (and you live in Iloilo) please do check out The Brown Paper Bag at the 3rd Level of Atrium Mall. They're also going to open a 2nd branch in Roxas City soon, I'll update this post as soon as I get ze details :)

If you like the clothes but you don't live in Iloilo, check out TBPB's facebook page at  https://www.facebook.com/TBPBClothing. They ship nationwide.

Photo credits: Mien Tagua and Ira Tan :)


Saturday, April 21, 2012

of beach trips and lip stains

Hi girls! I've been MIA for the past few days, we just got back from Nasugbu, Batangas. We stayed at the Canyon Cove Beach Club, and it was great to be able to see all my counterparts since we only get to see each other a few times a year. I was finally able to visit a beach and go swimming after 3 years (yes, I'm so lame, Boracay can be travelled by land from here and there are so many gorgeous beaches that are even nearer but I never took the time to go).


I stayed with my usual room mates/bed mates, C and L.


Hello Jessica Sanchez


Super gorgeous view to wake up to!


Of course, this post wouldn't be complete without beauty chorvas. For this trip, aside from the quintessential sunblock, my 2nd favorite beauty product is Etude House's Dear Darling Lip Tint in 03. 03 is an orange-based red that looks really nice and natural whether you're on land or swimming in the waters. 


What I Like:
  • Great staying power. After eating and swimming, it still stayed on 
  • Easy to apply and goes on evenly
  • Very pigmented
  • Non-drying
  • Mild, fruity scent
  • No weird taste
  • Comes in 3 shades, so you can pick one that matches your skin tone best
  • Cute packaging


What I don't like:
Nothing

How to Use:
 Swipe on your lips and spread. For cheeks, start with 3 small dots first (since it's pigmented, try building up the color gradually until you get desired color to avoid clown-red cheeks) and blend out to get a healthy, flushed look

Where To Get:
Etude House, for Php198

Would I repurchase?
Yes!

How about you? What's your favorite lip/cheek stain? Drop me a line! :)


Sunday, April 15, 2012

Darks and Pastels: Eye looks

I came up with these eye looks last Holy Week, when I was stuck at home with nothing to do. I initially wanted to try doing one look only, a deep green smokey eye inspired by a Make Up Forever Ad. But when I opened my 88 Original palette I saw all the yummy pastel colors and I just had to do a pastel look too. I was too lazy to do separate looks so I did it like the old times (when I was in grade school haha) and did different looks for each eye.

The first one I'm going to show you is the green smoky eye look. This is the ad that inspired it. I'll probably try to redo the entire look again soon.

My version:


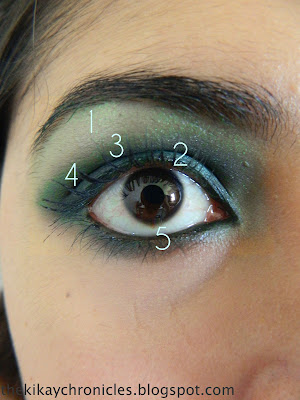
The shades in numbers:
1. Mint green e/s all over eyes as base color, from lashline up to browbone and in the inner corners of the eye
2.Forest green e/s from lashline up to crease
3. Choose a dark green color for the outer V and the crease to contour the socket
4. Use black e/s and blend it in with the dark green to deepen the contour of the eye. Blend out to avoid harsh lines
5. Take a black pencil liner and tightline your eyes. 

The model in the ad is wearing false lashes, but I couldn't find my lash glue that time so I just used mascara.

Where to Wear: since it's a dark, smoky eye, it would be great for parties, special occasions, or nighttime events. But if you're bold and daring enough to wear this during the day, go!! Smoky eyes for day are so ferosh.

 
The second look is all pastel colors, very light, fun and girly:

 
The shades in numbers:

1. Icy blue all over the lid, from lashline to browbone
2. Orchid e/s all over lids, from lower lashline to crease
3. Lavender e/s on outer v of the eye, use this also to contour the eye socket. 
4. Hot pink e/s applied with a slanted brow brush to line the upper and lower lashline only

Where to Wear: great for daytime events/occasions, or for ordinary days when you want to add a pop of color to your face


The two looks on me (sorry if I look like a crazy person, I do not recommend you do it like this going out btw).


Saturday, April 14, 2012

Myra E Vitasmooth Shine-Free Face Powder with SPF15

Last week, I accidentally dropped my Johnson and Johnson's powder compact and broke it into a million pieces. I would usually rotate between J&J and Maybelline face powders, so this time I thought about trying something I haven't used before.

When it comes to face powders, I just want it to be super basic- mild, non-comedogenic, translucent, no heavy coverage. With or without SPF is fine, because I always use a moisturizing SPF before heading out. Face powder is something I use on a daily basis so I don't like anything heavy to avoid clogging my pores.

After a few minutes of scouring Watsons' aisles, I got Myra E's Vitasmooth Shine-Free Face Powder with SPF 15 in Light.


Swatched on fingertip


The Claim:

Myra VitaSmooth Shine-Free Face Powder is a light face powder that covers blemishes for a naturally flawless and shine-free look.  

It is enriched with Vitamin E that nourishes skin and SPF 15 that protects you from the sun's UV rays.

Directions for use:  Apply gently and evenly on face. 

What I like:
  • Small, compact packaging
  • Vitamin E-enriched
  • Hypo-allergenic
  • For those who like multitasking products, this one already has an SPF of 15
  • Nice, even coverage
  • Not heavy/cakey. The shade light doesn't make me look like I dipped my face into a bowl of flour
  • It didn't break me out
  • Does a very good job of keeping the oilies at bay- sometimes I don't even have to retouch at all
What I don't like:
None
The Verdict:
I super like this product! It has good coverage and evens out my skin tone. It covers up like Maybelline's powder foundation but it's not as heavy. I patted some product on my undereye area and it brightened up a bit, so I didn't even have to wear concealer. And the thing that amazes me the most is that during the one week that I've used this, 4 out of 7 days I didn't even have to retouch at mid-day! (Note: I have combination skin, with my T-zone oilier than the rest of the face; and my work involves a lot of walking and sun exposure). And the days that I did retouch, I only did so once. 

Would I repurchase?
Yes!

Where to get and how much:
Watsons, Department Stores, Php 130 for 10g

Thursday, April 12, 2012

Iloilo Spa Feature: Shana Lacs Spa

Fun Fact- my high school thesis (published 2006) was all about the derma clinic and spa business in Iloilo City. At that time, there were only a handful of them in the city- no more than 10 as I recall, and I was fortunate enough to do a qualitative study where I was able to interview the managers and the owners of these establishments.

I shall spare you the deathly boring SPSS results and the detailed analysis and will jump straight to the point- the study came to the conclusion that the future of this industry was looking bright in this side of town, and more wellness and beauty centers will surely open their doors to cater to the Ilonggos' growing consciousness of their health and wellness.

One of the must-try places in the city is Shana Lacs Spa. I came here through the recommendation of a friend, and I was happy I took her word for it! One day after work, I was bone-tired and couldn't even walk properly because my feet were killing me (that's what I get for traipsing around in 4 inch heels for 12 hours). I remembered my friend's suggestion and immediately went there to try it out. When I stepped inside the spa, the ambiance was calm and relaxing- lights slightly dimmed, aromatherapy scents wafting through the air, with lounge-y music playing in the background.


I was greeted by the courteous staff and was offered a menu of their services for my perusal. The menu book was so cute, Thai-inspired and bound in satin, which perfectly matched the Balinese-style interiors. They have a variety of services available from body massages, body scrubs, hand and foot therapies to facials (all at affordable prices) that it was hard to choose one. They also have spa packages available that are more cost-effective if you want to have more than one service. During my first visit, I chose to get their Signature Body Massage (Php 258).

They actually took my blood pressure first before proceeding with the massage. I remembered that in the past 4 massage centers I frequent, none of them had ever taken my blood pressure before starting. Kudos to Shana Lacs for taking into consideration their customers' well being!

I probably got lucky that night, because at 10 pm and without an appointment, I was able to get one of the single rooms and get a massage right away (the next time I returned, I wasn't as lucky because the rooms were occupied and I had to wait a bit, and I wasn't able to get a single room).
Foot massage area

Single room- super like how they were able to prettify such a small space! I got inspired to decorate my room like this haha

Cubicles with cloth partitions


Needless to say, it was 60 minutes and Php 258 well spent. I didn't even feel like driving myself home, I just wanted to stay in the massage bed and sleep there undisturbed until morning came. I left the spa feeling like all the tension in my body has gone, and I clocked in a super restful 8 hours of sleep the second I got home.

If you want to relax and unwind after a long day,visit Shana Lacs Spa at Room 205 Adelina Bldg cor Gen. Luna and Jalandoni Streets, Iloilo City. Book your appointments through their contact number at (033) 338- 3206. They are open daily from 12pm-11 pm. Last call is at 10:00 pm, but just to be sure, make a call first to confirm availability of rooms/therapists if you plan on coming near closing time. For a sneak peek into their menu book of services, check out their Facebook page here :)


Photo Credits to: http://shanalacspa.blogspot.com/